
We use our portable generators continuously while we’re working on our remote property. Even after we install a permanent power solution, we will still need a portable generator. With that, it’s essential to keep them maintained regularly by following these steps.
- Regularly change out the fuel after a long period of no use.
- Change out the old oil and the filter if a filter is present.
- Clean the air filter.
- Remove and clean spark arrestor.
- Replace or clean the spark plug.
If you regularly maintain your generator, it improves the performance and could potentially extend the life of the device.
So now that you know the five steps, let’s get more in-depth with each item. I use these steps and include several images to assist with completely understanding some of them.
The steps used to maintain your portable generator might vary. The generator used for this article is a FIRMAN and looks very similar to several other portable generators on the market with wheels for more effortless mobility. Be sure to refer to your generator’s users-manual if any of the instructions here do not fit your brand and model.
Tools Needed to Maintain a Portable Generator
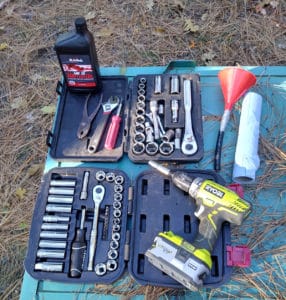
But first, there are tools required to complete the task of maintaining your portable generator. Here’s a checklist of tools and materials you’re going to need.
- Motor oil, a 30, 5-30, or a 10-30 will work just fine but look at your generators specifications to be sure.
- Diesel, kerosene, or other safe cleaning agents for cleaning the air filter.
- Socket set with a ratchet and most likely metric sockets.
- Some type of drain pan or dish to catch old motor oil from the engine.
- Open-end wrenches that are most likely metric.
- Phillips and possibly a flat head screwdriver.
- Pliers, channel locks, or vise grips. These will be used to potentially clean the spark arrestor.
- Wire brush or a small torch for cleaning the spark plug arrestor.
- Paper or cloth towels for wiping up oil and keeping things clean.
- Not necessarily needed, but if you have one, a drill or impact driver with a socket adapter in it. Having a drill will speed up any bolt removals and replacements, but is typically not going to be required.

- Spark plug socket – which in a lot of cases is supplied by the manufacturer. Otherwise, find one in your socket set. Make sure you have the right size. Typically on the larger portable generators, it will be a 15/16 inch socket, which is the larger of the two most common spark plug sockets.
- In some cases, a pair of needle-nose pliers might be needed. Especially if you have to remove pressure clamps often found on gravity-fed fuel lines.
TIP: Keep all your parts and or nuts and bolts in a specific place such as a plastic cup so you know where to locate them when they’re needed to put the unit back together.
Before Anything Else
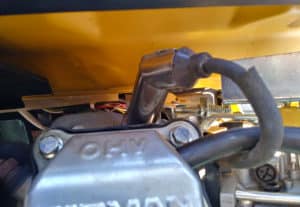
To prevent accidental starts it’s highly recommended that you remove the spark plug wire and ground it. Then turn the fuel valve, usually located under the gas tank, to the off position.
CHANGE THE FUEL – If Needed
Although this may not be a required step every time you maintenance your portable generator, it is something to keep in mind. If your generator has been in storage or not used for a long time the fuel in it can build up moisture and sludge that can keep your generator from starting or running properly. If it’s not possible to remove fuel after the winter months at least add a stabilizer to it before the cold weather. That simple task could prevent more costly repairs down the road.
If you do end up removing the fuel, it’s best to not only remove it from the tanks but also all the lines and the carburetor. The easiest way for this is first to drain the tank and then run the generator until it runs out all the fuel. Always unplug anything plugged into the generator before running it out of fuel. Otherwise, depending on the model, you can cause damage to the coil; in other words, you should always remove any load on the generator before stopping it.
Also, during this process, remove any water and dirt that can be found in a fuel strainer that’s located underneath the fuel valve. Some manufacturers may use a fuel filter that will occasionally need replacing based on the owner’s manual recommendations.
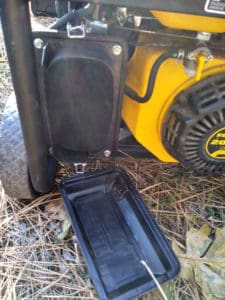
DRAIN THE OIL
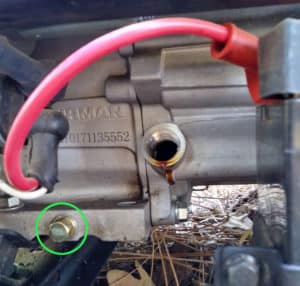
Refer to your owner’s manual for the location of your oil drain plug. Since I usually maintenance our generator in the field I have to create a makeshift drain pan. The key is to use something that is flat so it can fit under the generator motor easily, otherwise, you might have to figure out a way to lift the generator a few inches. One suggestion is to use something like a low profiled dog dish or a throw-away storage container that you know is large enough to hold the used oil volume. Also, warm up the generator before draining the oil to get the viscosity lighter so it will drain easier.
If your generator comes with an oil filter be sure to change it with a proper replacement filter for the best results. Check your manual.
Once all oil is drained into a container be sure to properly dispose of the old oil through whatever recycling means you have around you.
Plug the drain and then using a funnel fill your engine back up with a premium motor oil. Refer to the owner manual to determine the proper weight of the oil needed. For winter months you might want to use a lighter oil such as a 5w30 or 5w30 to help keep it from becoming too thick. When oil gets thick from the cold it can make starting very difficult. Again check with the manufacturer for proper instructions for this.
Replace your oil cap which is typically yellow in color. Finger tighten the cap because they are easy to strip out and cross-thread.
TIP: It’s always best not to underfill or overfill any small engine. Depending on the engine, doing either could keep the engine from starting.
CLEAN THE AIR FILTER
If you’re running your portable generator in a dusty or dirty area then this step is vital. It can also be a primary reason you could be having issues with running your generator.
For us, our filter can be removed and easily cleaned, oiled again and placed back into the unit.
If you’re not sure where the air filter is located then refer to the owner manual for the location. In many cases, it’s a plastic box with a lid that easily clips for removal and replacement of the filter. I use diesel or kerosene to clean the filter. DO NOT use gasoline to clean your air filter.
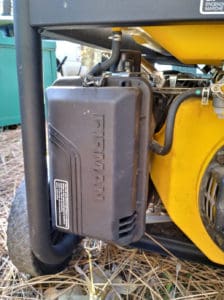
SPARK ARRESTOR – Remove & Clean (Check Muffler)

The spark arrestor is usually located somewhere on the exhaust system. It is a steel mesh screen of sorts that keeps sparks from flying out of your generator and potentially causing a fire.
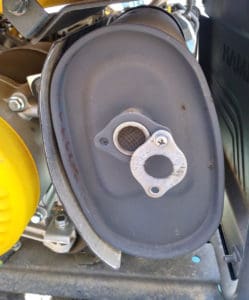
In the case of our portable generator, find two Phillips-head screws that need loosening and removed in order for the spark arrestor screen to come out.
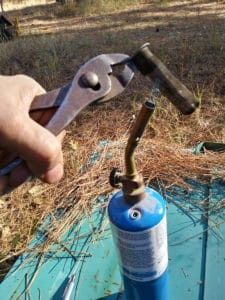
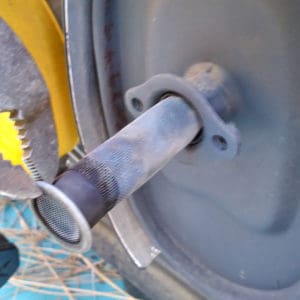
Using pliers or vise grips, remove the screen from its portal. Once out, do one of two things. Using a wire brush, brush off all the built-up carbon on the screen. Or, holding the screen with pliers or preferably, vise grips, use a torch to burn off the carbon built up on the screen. Apply the torch heat until the screen is no longer black but more of white ash color.
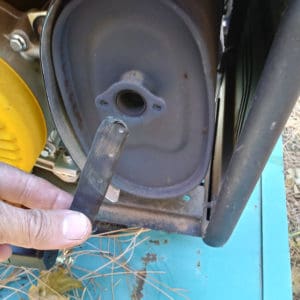
Once you have the spark arrestor screen all cleaned up, still using pliers or vise grips, carefully place it back into the portal on the muffler and screw the supporting bracket back on using the two screws. (Your reassembly process may vary depending on the generator brand.)
Also, check the muffler to see if there are any cracks or rusted-out spots. If there are, then the muffler will require replacement.
SPARK PLUG – Clean or Replace
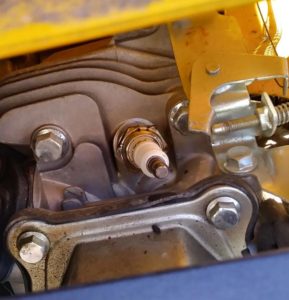
The spark plug should be replaced once a year. Up until replacement a simple brushing of the ground and center electrode area of the plug and a gap check should suffice. However, if you notice any cracks in the insulator or dark coloring on the end of the plug it could be a sign of a fouled plug or an improper plug gap.
TIP: Always operate the generator outdoors far away from any windows or vents to keep fumes (carbon monoxide) from leaking inside to an occupied space.
Okay, so once you have your unit all put back together, it’s time to try starting it. For me, I will make sure it starts using both the recoil and electric start. If I haven’t lost the remote, I will also test to see if the generator will start using it.
If your generator won’t start, or does start and shuts down after starting or starts and runs rough. Here are some things to check.
TROUBLESHOOTING AFTER MAINTENANCE
Here are some common things to check and try.
- Make sure you’ve turned the fuel valve back to the “On” position.
- Make sure to switch the engine to the ON position.
- Check spark plug wire; is it plugged in and seated correctly?
- Bad spark plug. Check it and replace it if necessary.
- Check the fuel level to make sure there’s enough fuel for operation. Otherwise, add some.
- Replace the fuel filter if one is available.
- Low oil level. The motor can stop if the generator isn’t sitting on a level surface. Set the device on a level surface and retry or add the crankcase with the appropriate amount of oil.
- The air filter could be dirty, if need be, clean or replace this filter.
One Last Thing…
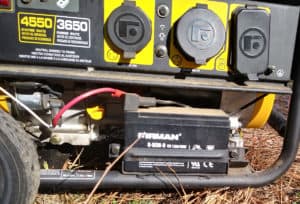
Also, if you have a battery on your generator, be sure to test its charge. Batteries, in general, will often fail during the cold winter months when you most likely will need the generator the most. Make sure yours is working and ready for the colder months. Most of these batteries on portable generators are sealed batteries and require little maintenance. Fully charge the battery, and if it fails to keep a charge and quickly start your generator, it’s likely, it’s time to replace.
Conclusion
Doing regular maintenance on your generator really does not take all that long. Keep an eye on your hours of use and follow the recommended maintenance schedule offered by your generator’s manufacturer. It’ll save you money in the long run.
Thanks for reading.